How to Make a Basic Rock Beat in GarageBand
This tutorial will guide you through creating a basic rock beat. We will also cover:
- Using the cycle region for overdubbing.
- More exploration of the Track Editor
- Velocity control in the preferences
- Meter - Beat (2, 3, 4) v. division (2 or 3)
- Open GarageBand
- Create new project (Call it "Drum Beat")
- Open "Preferences" in the File menu.
- Click the box to turn ON Cycle Recording. (If it is OFF, you can do multiple takes. If it is ON, it will add to whatever is already recorded.)
- Turn on the Cycle Region, make it 2 measures long.
- Add a new Rock Kit track.
- Find the bass drum (kick), snare, and high hat on the keyboard (C1, E1, F#1).
- Record the bass drum on beats 1 and 3.
- Edit in the Track Editor.
- Record the snare drum on beats 2 and 4.
- Edit in the Track Editor.
- Record the high hat on the divisions.
- Edit in the Track Editor.
- Listen to your drum beat and make any final edits.
- At this point, you can loop your drum beat as many times as you need.
- If you need to, you can adjust the velocity control in your preferences.
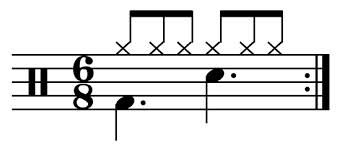
- Change the time signature to 6/8.
- Record the bass drum on beat 1. Edit.
- Record the snare drum on beat 2. Edit.
- Record the high hat on the divisions. Edit.
- You are now ready to make your own rock beat.